Simple Installation – Step by Step
The installation of the dongleserver Pro is fast and easy. It does not matter whether you are working in virtual environments, e.g., Citrix, VMware or Microsoft Hyper-V, or with "Fat Clients": You only need to set up the Dongle Server and install the UTN Manager software tool on your workstation. The following is a step-by-step guide.
Step 1: Unboxing and Connecting Dongles
Open the box and take out its contents. In addition to the Dongle Server you will find the Quick Installation Guide, an external power pack, and two keys for locking the Dongle Server.
Put the Dongle Server right in front of you and open the casing with one of the keys.
Insert all the dongles you wish to use into the USB ports, put the cover back on the Dongle Server, and lock it.
Step 2: Connecting the Dongle Server and Installing the Software
Connect the Dongle Server with the power supply. You will find the power cord at the back of the Dongle Server.
Connect the network cable (RJ-45) to the Dongle Server.
Download the installation file for the UTN Manager and follow the installation routine. When the UTN Manager is installed, start it.
Step 3: Searching for, Choosing and Activating Dongles
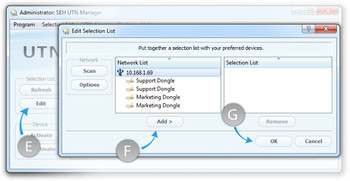
Click the menu item "Edit" (E) to open the "Edit Selection List". This list shows all Dongle Servers available within the network. By clicking on "Add" (F) and "OK" (G) you link the selected Dongle Server to your UTN Manager. The Dongle Server is now ready for use.
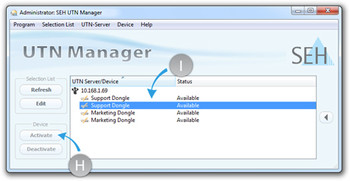
Next, you see all the dongles connected to the Dongle Server. To connect one or more dongles to your desktop, select the desired dongle (H) and activate it (I). The dongle is now connected to your computer as if it were locally connected.
Find further information on the UTN Manager.